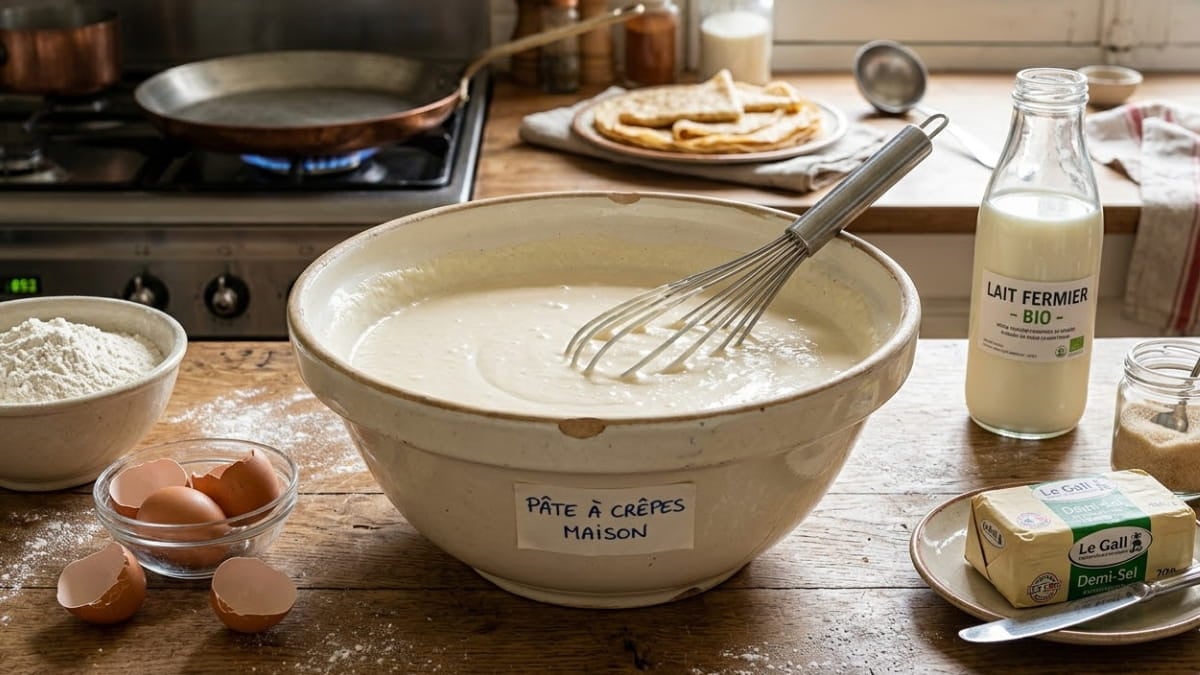
Making crepes without lumps is one of the fundamental basics of French cooking. Whether you are a beginner or an experienced cook, a smooth and homogeneous crepe batter changes everything: soft crepes, easy to cook and with impeccable texture. Discover in this article the secrets to obtaining a perfect batter, free from the unpleasant lumps that spoil your preparations.
Why Does Your Crepe Batter Contain Lumps?
The main causes of lumps
Lumps in a crepe batter typically appear for three reasons: adding flour too quickly to a liquid, insufficiently mixing the ingredients, or using flour that isn’t well sifted. When flour comes into contact with cold milk abruptly, it swells and forms small clumps before it can properly dissolve. This chemical reaction is inevitable without the right technique.
Impact on the quality of your crepes
Lumps in your preparation lead to visible and taste defects: uneven texture, crepes that are thick in some places and thin in others, an unpleasant mouthfeel. A homogeneous batter is therefore essential to succeed with crepes every time.
7 Techniques To Get a Smooth, Lump-Free Batter
1. Sift the flour before adding it
This is the number one secret to prevent lumps. By sifting your flour, you aerate it and remove compacted grains. Use a fine sieve or a strainer and pour the flour directly above your bowl. This step eliminates up to 80% of lump problems.
2. Mix the dry ingredients first
Before adding any liquid, mix the sifted flour, sugar, and salt in a bowl. This preparation of dry ingredients ensures even distribution and facilitates progressive incorporation of the milk. The dry mix creates a stable base that better accommodates the liquids.
3. Add the milk gradually while whisking
This is a fundamental technique: pour the milk gradually (about 25% at a time) while vigorously whisking. This method allows the flour to hydrate properly without forming dry pockets. Whisk vigorously between each milk addition: at least 30 seconds per addition.
4. Use a manual or electric whisk
A classic whisk or an electric mixer homogenizes the batter much better than a spoon. The circular motion of the whisk breaks lumps that start to form and creates an optimal emulsion. Prefer a sturdy whisk: the more closely spaced the wires, the better the uniformity.
5. Let the batter rest for 30 minutes
After preparing your crepe batter, cover the bowl and let it rest for at least 30 minutes at room temperature. This resting time allows the flour to finish absorbing the milk and any residual lumps to dissolve naturally. The batter becomes smoother and easier to cook.
6. Sift the batter before cooking (optional but effective)
For an ultra-smooth result, pass your rested batter through a fine sieve just before you start cooking. This step eliminates the rare lumps that may remain and aerates the preparation for lighter crepes.
7. Add the eggs and butter at the end
Integrate the eggs and melted butter (when the batter is smooth) last. Whisk gently to incorporate without creating lumps. The eggs provide structure; the butter guarantees a creamy texture. Adding them earlier complicates the homogenization process.
Traditional Method vs Quick Method
The traditional method (recommended)
Total time: 40 minutes
- Sift the flour twice
- Mix flour + sugar + salt
- Pour 25% of the milk and whisk for 30 seconds
- Repeat 3 times until the milk is finished
- Add eggs and butter
- Let rest for 30 minutes
Result : A perfectly smooth batter, crepes of optimal quality.
The quick method (for those in a hurry)
Total time: 5 minutes
- Use a blender or electric mixer
- Pour all ingredients at once
- Blend 1–2 minutes on medium speed
- Let rest 10 minutes if possible
Result : Very decent if the blender is powerful, but less reliable than the traditional method.
The Essential Tools for Lump-Free Batter
A few simple pieces of equipment make all the difference :
The fine sieve
Invest in a quality sieve with a fine mesh (1–2 mm). A professional pastry sieve lasts 20 years and costs less than €15. It is the most cost-effective tool.
The sturdy whisk
A good stainless steel whisk with closely spaced wires is 100 times more effective than a spoon. The whisk creates a mechanical action that breaks lumps forming.
The blender (optional)
For the quick method, a small personal blender is enough. A standard model costs €30–40 and homogenizes perfectly in a few seconds.
Common Mistakes to Absolutely Avoid
❌ Adding all the flour at once
This is the first mistake: pouring all the flour into the milk at once triggers a massive gelling reaction. Lump formation happens instantly and is almost impossible to break.
❌ Skipping sifting flour
Omitting this step dramatically increases lumps. A compacted flour “sticks” differently to the milk and forms balls more easily.
❌ Using milk that is too cold
Take your milk out of the fridge 5 minutes beforehand, or use milk at room temperature. Cold milk makes lumps more numerous and harder to break.
❌ Not whisking enough
A gentle stir is not enough. Whisk vigorously for at least 30 seconds after each milk addition.
Regional Variations of Crepe Batter
Breton crepe batter
The traditional Breton crepe uses salted butter and cider (no sugar for savory crepes). The technique remains identical: sifted flour, progressive liquid addition, 1-hour rest.
Parisian crepe batter
More sweetened, with vanilla sugar. The addition of sugar aids homogenization as it acts as a light lubricant. Prepare it in the same way but with a shorter rest (20 minutes).
Frequently Asked Questions
The crepe batter can rest up to 12 hours in the refrigerator, covered. For a shorter rest, 30 minutes at room temperature is enough. The longer the rest, the smoother the batter becomes as the flour continues to absorb the liquids. Before cooking, take it out 5 minutes from the fridge.
Yes, it’s very effective! Put all the ingredients in the blender and blend for 1–2 minutes. This method creates an ultra-smooth batter. Caution: don’t exceed 2 minutes to avoid overdeveloping gluten (crepe less fluffy). This technique replaces resting because the blender aerates the preparation.
Wheat flour T55 (classic white flour) is ideal for crepes. It has a low gluten content and sifts easily. Avoid T150 flour (wholemeal) which tends to compact more. Always prefer freshly opened flour, as moisture can alter it.
Three causes: (1) you didn’t sift the flour initially, (2) the resting time was insufficient (minimum 30 min), (3) you added the flour too quickly. Solution: pass the batter through a fine sieve just before cooking.
Yes, greatly. Cold milk (straight from the fridge) worsens lumps. Warm milk (room temperature) facilitates the gradual hydration of the flour. For best results, use milk at 20–25°C and mix it gradually.
Two siftings are sufficient for 95% of cases. A third sifting slightly improves the result but takes time. Professionals typically perform 2 siftings: one before mixing, one before adding to the liquids.
Additional Expert Tips for Crepe Batter Mastery
To go further in mastering your crepe batter :
Adjust the consistency to your taste
If your batter is too thick, gradually add some milk while whisking. If it’s too runny, add a spoonful of sifted flour at a time. The ideal consistency? It should pour slowly into the pan without being too fluid (like thick skim milk).
Adapt for special crepes
For softer crepes : increase the eggs and let rest for 1 hour. For very thin and crispy crepes : reduce resting to 15 minutes and slightly reduce the eggs.
Make crepes uniform
A lump-free batter is easier to cook evenly. Pour the same amount each time (a 125 ml glass is perfect) and spread gently with the back of a spoon before the batter sticks too much.